


Outdoor limestone pavers are exposed to rain, dirt, spills and changing weather conditions. Since limestone is naturally porous, it can absorb moisture and develop stains over time. Learning how to seal limestone pavers helps protect your outdoor surfaces, simplify cleaning and maintain their natural appearance.
The process involves cleaning the stone, selecting a suitable sealer, applying it correctly and allowing enough curing time. This guide explains each stage, including common mistakes, maintenance tips and when to reseal your limestone paving.
| Sealing Stage | What to Do | Important Tip |
| Preparation | Remove dirt, stains and debris | Use a limestone-safe cleaner |
| Drying | Allow the stone to dry | Follow the sealer’s moisture requirements |
| Testing | Apply sealer to a hidden area | Check colour and finish |
| Application | Apply evenly in manageable sections | Avoid puddles and excess product |
| Curing | Protect the treated surface | Follow the manufacturer’s curing instructions |
| Maintenance | Clean and inspect regularly | Reseal when protection declines |
Do Limestone Pavers Need to Be Sealed?
Sealing is generally recommended for outdoor limestone, especially around patios, pathways, entertaining areas and swimming pools.
Limestone contains small natural pores that can absorb water, oils and other liquids. A suitable sealer reduces absorption, helping prevent some stains and making everyday maintenance easier.
However, sealing does not make limestone completely waterproof, stain-proof or acid-proof. Acidic substances can still etch the stone, and spills should be cleaned promptly.
Understanding the benefits of limestone can help homeowners make informed decisions about protecting their outdoor paving.
When Should You Seal Limestone Pavers?
New limestone pavers should generally be sealed once installation is complete, the surface is clean and the bedding materials or grout have cured sufficiently. Some installations require sealing before grouting, so check the installation recommendations.
Existing paving may need sealing when water absorbs more quickly or stains become increasingly difficult to remove.
Weather conditions also matter. Avoid sealing immediately before rain, during extreme temperatures or when the stone contains excessive moisture.
Always check the manufacturer’s requirements for surface temperature, moisture levels and application conditions.
Read more: pros and cons of limestone flooring
What You Need to Seal Limestone Pavers?
Having the correct materials ready helps you work efficiently and achieve consistent coverage.
Limestone-Compatible Sealer
Choose a sealer specifically approved for your limestone type, surface finish and outdoor application.
Depending on your requirements, this may be a penetrating impregnating sealer, a colour-enhancing treatment or a suitable surface coating.
Cleaning Supplies
Prepare a soft-bristled broom, clean water, a pH-neutral stone cleaner and a non-abrasive scrubbing brush.
Avoid acidic cleaners or harsh chemicals that may etch limestone. For detailed cleaning instructions, read our guide on how to clean limestone pavers.
Application Tools
Depending on the sealer, you may need a microfibre applicator, brush, roller or low-pressure sprayer.
Also prepare clean absorbent cloths, protective gloves, suitable eye protection and masking materials to protect surrounding surfaces. Use any additional personal protective equipment specified on the product label.
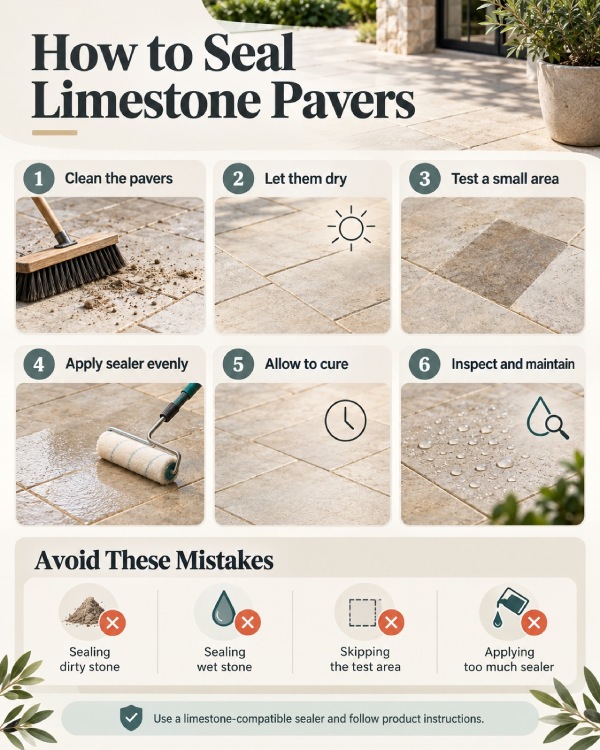
How to Seal Limestone Pavers Step by Step
Learning how to seal outdoor limestone pavers involves more than simply spreading a product across the surface. Careful preparation, controlled application and sufficient curing are essential for reliable results.
Step 1: Clean the Limestone Pavers
Start by sweeping away leaves, dust, loose dirt and other debris. Use a limestone-compatible cleaning solution to remove remaining surface contamination.
Pay attention to food stains, grease, algae and accumulated grime. Existing stains may become more difficult to address after sealing, so they should be treated beforehand.
Rinse thoroughly according to the cleaner’s instructions and remove any remaining cleaning residue.
Step 2: Let the Pavers Dry Completely
For sealers requiring a dry substrate, allow the limestone to dry thoroughly before application.
Limestone can retain moisture below the visible surface, even when the paving appears dry. Moisture trapped beneath an incompatible treatment can contribute to uneven results or surface discolouration.
Drying time depends on the weather, stone thickness, installation and product requirements. Some specialised sealers permit application to damp substrates, so always follow the instructions for your selected product rather than assuming every sealer requires identical conditions.
Step 3: Test the Sealer on a Small Area
Before sealing the entire surface, apply the product to an inconspicuous section or spare paver.
Check whether the treatment changes the limestone’s colour, creates an unwanted sheen or leaves visible residue.
Allow the test area to dry and cure as instructed before assessing the result. Testing is particularly important for light-coloured limestone and colour-enhancing products.
Step 4: Apply the Sealer Evenly
Follow the product instructions for mixing, application tools, coverage and the number of coats.
Apply the sealer evenly in manageable sections, working systematically to avoid missed areas and overlapping marks.
For penetrating sealers, allow the specified absorption period and remove excess product as directed. Do not allow unwanted residue to dry on the surface.
Some limestone surfaces require additional applications, depending on porosity and the product formulation. Never assume that applying more sealer automatically provides better protection.
Step 5: Allow the Sealer to Dry and Cure
Protect the treated limestone from rain, spills, cleaning and foot traffic for the periods specified by the manufacturer.
Drying and curing are different. A surface may feel dry before the protective treatment has reached its full performance.
Temperature, humidity, ventilation and product chemistry all influence curing. Follow the manufacturer’s instructions instead of using a universal waiting period.
Step 6: Check the Finished Surface
After curing, inspect the limestone under natural light.
Look for uneven colour, streaks, glossy patches or other signs of excess sealer. If problems appear, consult the manufacturer before applying another coat or attempting removal.
Where appropriate, a small water-drop test can provide an indication of water repellency. Water should behave according to the product’s stated performance characteristics, although this test cannot confirm complete stain protection.
Read more about limestone: crushed limestone vs crushed concrete
How to Choose the Best Sealer for Limestone Pavers
The best sealer for limestone pavers depends on the stone’s porosity, surface texture, existing treatments and intended use.
Penetrating vs Topical Sealers
Penetrating or impregnating sealers absorb into the limestone and help reduce liquid penetration without necessarily creating a visible surface film.
They are commonly considered for outdoor natural stone where preserving the original appearance and texture is important.
Topical sealers form a protective coating on the surface. Some can produce a satin or glossy finish, but they may require different maintenance and can affect surface traction.
Neither option is universally suitable. Product compatibility, exposure conditions, breathability and maintenance requirements should guide the decision.
Natural-Look vs Colour-Enhancing Sealers
Natural-look sealers aim to preserve the limestone’s original appearance, making them attractive for homeowners who prefer subtle finishes.
Colour-enhancing sealers deepen or enrich the stone’s natural tones, sometimes producing a wet-look effect.
Both options should be tested before full application. An enhancing treatment may change the appearance of light limestone more noticeably than expected.
Choosing a Sealer for Pool Areas and Other Wet Locations
Pool surrounds require additional attention because the paving is regularly exposed to water, pool chemicals and bare-foot traffic.
Choose a product specifically approved for the particular limestone and poolside conditions. Consider how the treatment affects slip resistance, especially when the stone is wet.
A suitable sealer should not be assumed to improve traction. Where slip safety is important, seek appropriate product advice and verify the finished surface’s suitability.
For homeowners considering limestone for an upcoming outdoor project, Hunter Pavers can help you explore natural stone options and choose paving suited to your design and intended use.
Common Mistakes When Sealing Limestone Pavers
Several avoidable mistakes can reduce the effectiveness of limestone sealing or affect the stone’s appearance.
Sealing Dirty or Wet Limestone
Applying sealer over dirt, stains or excessive moisture can compromise results. Always complete the necessary cleaning and meet the selected product’s substrate requirements.
Using the Wrong Sealer
Not every stone sealer is suitable for limestone. Products designed for other materials or indoor conditions may produce undesirable results outdoors.
Skipping the Test Area
Without testing, colour changes, unwanted sheen and compatibility problems may only become visible after treating the entire area.
Applying Too Much Sealer
Excess product can leave streaks, sticky residue or uneven patches. Follow the recommended coverage rate and remove surplus material as instructed.
Ignoring Manufacturer Instructions
Different sealers have different application temperatures, recoat windows and curing requirements. Ignoring these details can reduce protection and create unnecessary maintenance problems.
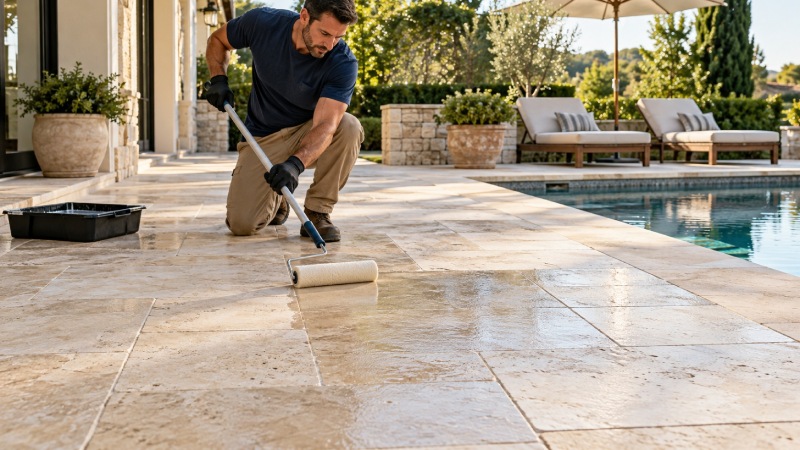
How Long Does Limestone Sealer Last?
The lifespan of limestone sealing varies considerably with the product, stone characteristics, installation conditions and exposure.
Some quality impregnating sealers may provide protection for several years under suitable conditions. However, heavily used entertaining spaces and exposed pool areas may need attention sooner.
Sunlight, rainfall, cleaning methods and the frequency of spills can all affect performance.
Rather than relying solely on a predicted lifespan, inspect your paving periodically and compare its condition with the manufacturer’s maintenance recommendations.
read more: seal travertine tiles
How to Maintain Sealed Limestone Pavers
Regular maintenance helps preserve both the limestone and its protective treatment.
Sweep the paving to remove abrasive dirt, leaves and debris. Wash it with a pH-neutral, natural-stone-compatible cleaner when necessary.
Clean spills promptly, particularly oils, grease, wine and acidic liquids. Even sealed limestone remains vulnerable to certain stains and chemical damage.
Avoid acidic cleaning solutions, aggressive scrubbing and high-pressure washing unless the stone supplier and sealer manufacturer confirm the method is suitable.
These habits are useful for limestone paving and other natural stone pavers installed around Australian homes.
How Often Should Limestone Pavers Be Resealed?
There is no universal resealing schedule for limestone.
The appropriate interval depends on the original sealer, installation conditions, weather exposure and maintenance routine. Follow any inspection or reapplication guidance provided by the manufacturer.
Signs that resealing may be necessary include faster water absorption, increasingly persistent stains and a noticeable reduction in water repellency.
Before resealing, identify the existing treatment and confirm compatibility with the new product. Some coatings require specialised preparation or removal before another sealer can be applied.
DIY vs Professional Limestone Sealing
Sealing limestone can be a suitable DIY project for homeowners working with a manageable area and a clearly specified product.
A DIY approach offers flexibility and may reduce labour expenses, provided you have the correct equipment and understand the preparation requirements.
Professional sealing may be preferable for large patios, difficult stains, previously coated surfaces and pool surrounds where slip resistance requires particular attention.
A specialist can assess the limestone’s condition, identify potential compatibility problems and recommend an appropriate preparation and sealing process.
Explore Hunter Pavers’ limestone paving options or contact the Hunter Pavers contact team for advice on choosing natural stone suited to your outdoor project.
Conclusion
Understanding how to seal limestone pavers helps you protect your outdoor stone while maintaining its natural beauty. The most important steps are cleaning the surface properly, choosing a compatible sealer, testing before application and following the manufacturer’s drying and curing requirements.
Sealing can reduce absorption and simplify maintenance, but regular care remains essential for long-term results.
Whether you are maintaining an existing patio or planning a new outdoor area, selecting quality limestone is an important starting point.